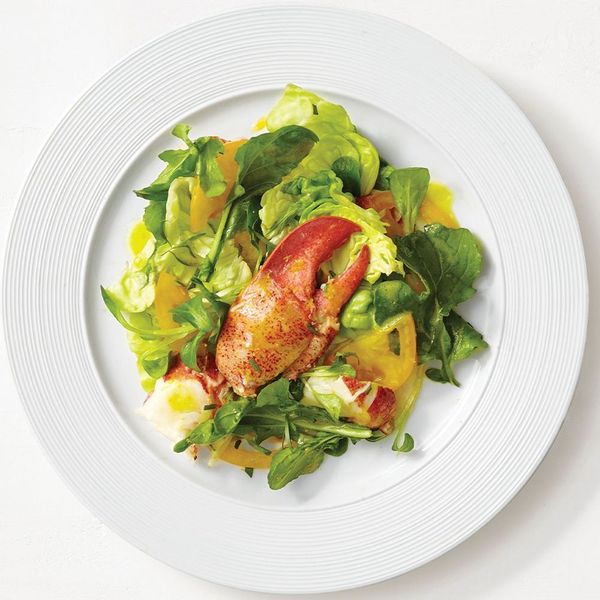

Our lobster salad recipe combines sweet lobster meat and juicy tomatoes with a citrusy vinaigrette for an elegant, company-worthy seafood dish. To make it, you’ll first cook lobsters in simmering water, then chill them down in an ice bath while you prepare the other ingredients. Oranges and lemon add both their juice and zest to the vinaigrette, which gets a subtle bite from Dijon mustard and minced shallot. Arranged over mixed greens, the sweetness of the lobster and tomatoes mingle with the subtle licorice flavor of tarragon and the brightness of fresh citrus for a memorable summer salad.
Tips for Storing and Cooking Lobster at Home
Cooking live lobsters can be an intimidating kitchen task, but a few key tips make it easy to handle.
Storing Live Lobsters
It’s best to purchase live lobsters the day you plan to cook them, though they can be stored for up to 24 hours in your fridge covered with seaweed or wet newspaper (the moisture will help keep them fresh). Do not store them in the freezer or submerged in water.
Quick Freeze Before Cooking
Many people choose to put the lobsters in the freezer for 15 to 30 minutes prior to cooking, which gently puts them to sleep and can make plunging them into the boiling water a bit easier. Be sure to not leave them in there for too long as the freezer will eventually kill them and freeze the meat.
Don’t Forget the Ice Bath
Moving the cooked lobsters directly to an ice bath will halt the cooking process, keeping your meat from overcooking. Be sure to have this ready before the lobsters come out of the pot.
Equipment Needed for Cooking Lobsters at Home
You’ll need the following pieces of kitchen equipment handy to boil and breakdown whole lobsters in your home kitchen:
- Large pot: Use a pot that’s large enough to comfortably cook the two lobsters called for in this recipe. (Using too small of a pot can impact how evenly the lobsters cook, which can affect the texture of the meat.) If you don’t have a pot large enough to fit both lobsters at once, cook them one at a time.
- Tongs: While not essential, it’s very helpful to have tongs on hand to transfer the boiled lobsters from the pot into the ice bath.
- Cutting board: A cutting board will provide a sturdy surface to work on. To keep it from sliding around, place a few damp paper towels or a damp kitchen towel underneath.
- Sharp chef’s knife and kitchen shears: A sharp chef’s knife makes quick work of cracking open the claws to free the meat inside. If you have lobster crackers, you can certainly use these instead. A pair of kitchen shears is useful for trimming the knuckles to help release the meat.
- Large bowl: Use a large bowl to catch any juices while cracking open the lobster and hold the shells as you work.
- Baking sheet: Set out a baking sheet to hold the pieces and meat as you work to catch any juices and keep the meat separate from the shells.
How to Break Down a Lobster Easily
After your lobsters have thoroughly cooled in the ice bath, follow these steps to free the meat from the shells:
- Working over a bowl, twist off the tail from the body by holding the tail in one hand and the body in the other and twisting in opposite directions. Twist off the claws at the joint where the arm, or knuckle, meets the body. (Place the claws and tail on the baking sheet as you go to catch any additional juices.)
- Place the body and attached legs in the bowl—while both contain a small amount of meat, we won’t be using it in this recipe. Pick the meat and use it for a pasta or bisque or leave the body and legs intact for making stock (see tip below).
- Firmly break off the fin from the tail and add it to the bowl. Lay the lobster tail on its side and apply gentle pressure with your hands until you feel or hear the shell crack. Use your thumbs to apply pressure to the back of the shell to release the tail meat inside. You can pull the meat to split it apart and remove the green tomalley (liver) and any orange coral (roe) inside.
- Using a kitchen towel to protect your hands, twist the knuckles away from the claws; set claws on baking sheet. Trim the ends of each knuckle with kitchen shears, then cut along the claws on each side to free the meat.
- To crack open the claws, use the back of a chef’s knife—not the blade!—to firmly whack the center of each claw on both sides. (Hold the claw steady with a kitchen towel as you do this.) Jiggle the pincher back and forth to loosen, then twist and force it in the opposite direction to remove it from the claw. Pull apart the shell pieces and remove the meat.
Don’t Toss the Shells!
There’s plenty of flavor in the head, body, shells, and legs that you can harness to make a delicious lobster stock in the future. Give it all a quick rinse and transfer to a freezer bag. Store in the freezer for up to 2 months. Lobster stock can be used to make a rich seafood stew, bisque, or risotto.
Make Ahead
Lobster meat and dressing can be prepared up to 1 day ahead. Refrigerate them separately in airtight containers until ready to use.